|
Rail Building
Part 1: Fundamentals
Most Transport Tycooners will find railways their most useful tool.
Personally, I use trains for almost all of my cargo. Below is a
list of popular layout styles for your game.
Layout
There are two main types of layout - point-to-point and anywhere-to-anywhere.
Although there is no reason why you can't use both in one game,
you may find it easier to stick to the anywhere-to-anywhere style,
as explained below.
Point-to-Point
The point to point layout is the simplest layout possible, with the
absolute minimum amount of track being built. The line goes from one
station directly to the other. The problem with this style of design
is each new station requires an entire new line. This is the style
used by the AI with extremely limited success.
I personally never use the point-to-point system because it is
too simple and inefficient. It's like connecting the dots - you
can train a chimp to do it. Also, the requirement of new lines for
each station can cause huge complex webs of tracks and stations,
especially if there are only two factories or food processing plants
on the map. A network layout is far better for these situations
Network
This refers to a layout where all or most of the stations are connected
so a train can go from anywhere to anywhere. The good thing about
this is you don't have to build an entire new line for each station,
and you can send your cargo across the map easily without having to
build more track.
Networks are by definition more complex than point to point layouts
and as a result there are many problems associated with them.
- Lost trains. With complex networks, trains choose
the wrong track at a junction. This could be caused by trains trying
to go to a depot, or getting confused if they need to turn left
to head right. Solving these problems is relatively simple with
the usage of check points or placing depots in the trains orders
using TTDPatch or by using better designed junctions or stations as explained
through out the rail section of this site. Try not to build places
where trains can do U-Turns.
- Higher initial costs. Compared to point-to-point,
you need to initially build more tracks, tunnels and bridges, but
over the long term there will be a saving as you can send several
trains down one line.
- Traffic jams - When you try to cram too many
trains down one track, or trains get lost and confused, gridlock
is a common result. Once your trains are in gridlock, the only real
way to get them out is by telling the train(s) at the frount to
either change direction or ignore the signal. Use extreme caution
when doing this as you may cause trains to collide - save your game
first just in case.
Traffic jams can be avoided depending on the cause of the hold
up. A well designed network will never have such hold ups, but that
is almost impossible. If the problem is due to too many trains in
one track, consider expanding the track. Sometimes its one bad junction.
Through out this site there are many good tips on how to avoid this
problem.
I personally always use networks for my rail layout and as a result,
almost all the the rail section of this site relates to them.
Signals
Signals are the most important part of any good rail network. They
prevent collisions and can be used to direct trains. There are two
main types of signals, two way sigils, which trains can go through
both directions, and one-way signals, which trains can only go through
one direction, the direction the signal is facing. Trains behave
differently with different signals. Consider the following:
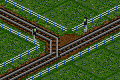
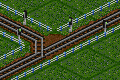 |
A train coming from the bottom of the picture
heading towards a station left of the picture sees the two signals.
If both are green, it will take the track which goes in the
general direction of its destination. If one signal is red,
however, it will choose the green one, even if it goes in the
opposite direction it's headed.
Rule: Use two-way signals if you want the train to choose a
free track, like in multi-platform stations, for example. Placing
two-way signals in front of each platform will make the train
choose one that's free. |
 |
But what if you want the train to choose
the one that goes in the right direction, not the free one?
Then you use one way signals. A train coming from the bottom,
heading left, will chose the track heading left. If that signal
is red, it will go left then stop and wait for the signal
to turn green.
Rule: Use one way signals if you want a train to choose the
track that goes closest to its destination, such as at junctions
where tracks split into two. |
 |
What if you want to force the trains to choose
one track only? Then you use two one way signals facing different
directions. The train will not choose the track with the signal
facing away from it. If it does, it will get to the signal,
stop, turn around and go back the way it came.
Rule: A train will never choose a track with a one way signal
facing away from it. This could be very handy when forcing a
train to go into a depot (see: Depots)
. |
Pre-Signals
Pre-signals are one of the greatest features of TTDPatch. The standard signals in the game are red if the track
between it and the next signal, including all sidings, has a train
on it. Once that train has past the next signal, the first one goes
green. Pre-signals are different. The are red when all the next
signals are red. This way, a train attempting to enter a station
that is full will wait at the signal before the two-way signals
at the start of the station, instead of waiting at the signal for
the first platform it comes across. The pre-signals in version 1.7
are different to those in version 1.8. Here we'll talk about the
advanced pre-signals in version 1.8.
 |
There are 3 types of
signals that can be used in the pre-signal set up. The top one
is an entrance signal. These are placed at the entrance of a
pre-signal set up and are red if all of the signals in every
possible direction down the track are red, providing they are
of the next two types. |
 |
The second type of pre-signal is
an exit signal. It marks the end of the pre-signal block. These
should usually be two-way signals so trains will "choose"
green tracks over red ones. Exit signals are placed in front
of the platform (assuming you're building a station) and behave
like normal signals. |
 |
The third type is a combo signal.
These are a combination of an entrance and an exit signal. Like
exit signals, these should usually be two-way signals so trains
will "choose" clear tracks. If all exit and combo
signals in a pre-signal set up are red, then the entrance signal(s)
leading to them will also be red. Alternatively, if all combo/exit
signals behind a combo signal are red, then it too will be red.
|
Placing these advanced signals is easy, but you'll need the pre-signals
option (-w) activated in TTDPatch. If one or more one way signals
leads to one or more two way signals then the end of the line(s)
or another one way signal, then the first one way signal(s) will
automatically become an entrance and the two way signal(s) will
become an exit. The last one way signal will not change and any
one way signals facing the opposite direction to the first signal(s)
will not effect any pre-signal setup.
To manually place pre-signals, simply place a signal normally on
the track, then ctrl+click it once for an entrance signal, twice
for an exit, three times for a combo and a fourth time to return
it to a standard signal. You'll need both the pre-signals option
(-w) and the exit pre-signals option (-Xw) activated in TTDPatch.
|